DIY Paint Chip Abstract Art

Hi Friends!

It’s chaos in our house with kitchen stuff. Holy guacamole! We *hope* it’s going to be worth it!! We promise to update you as soon as we can 🙂 We are in that two steps forward, one step back mode right now. In the meantime, I thought I’d share with you a super easy art project – paint chip abstract art! It’s an easy one, but it takes a bit of time. I did mine over the course of a few days.

Here’s what you need:

  • A frame in whatever size you want – mine was large, approximately 19×27.
  • enough paint chips to cover your frame in a variety of shades and tones – I used the solid colour ones versus the chips with multiple colours on one swatch
  • paper for back – I used gold metallic, but after the fact, it occurred to me that black would be striking as well
  • scissors
  • a ruler
  • double sided tape

Colour Block Art 1

Step One: Cover your frame backing in your gold paper using double sided tape. Then spread your paint chips out so they are all mixed up.
Paint Chip Art 1

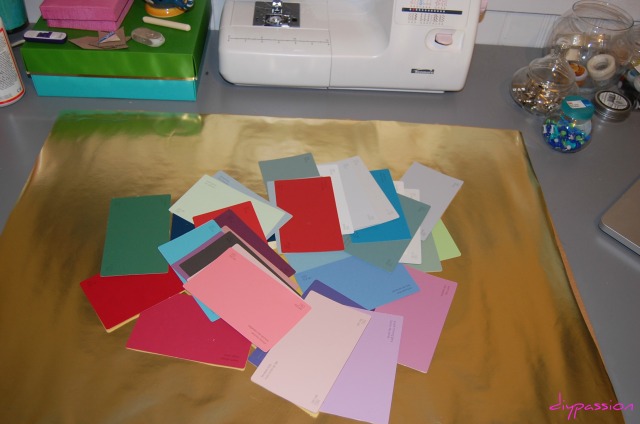
Step Two: Figure out the ‘best way’ to cut your chips. Mine were 3″ wide and I wanted strips, so I proceeded to cut each one into 1 inch strips. This took a fairly long time, but I put Netflix on my lap top and cut away. I tried to do two at once, but they were too slippery – so take your time and do one at a time to make sure your cuts are as even as possible.  Continue reading

Craft Project: Simple Hanging Pom Poms

Here’s another post that’s been kicking around in my ‘drafts’ folder that I’ve totally forgotten to post! *Bad blogger!!*

Oh well – better late than never, right? Consider this a little bonus post, I guess 😛

Remember back when we did our spare room reveal? I had put some little hanging pom poms in the corner for visual interest and to add some height. They are a great temporary solution if you are looking for whimsy and hilarity.

Here’s a quick primer on how to make tissue paper pom poms (which auto-correct wants to be ‘pin pons’ ??)

Step One: Lay multiple layers of tissue paper on top of each other. And then start folding it length wise to make a ‘fan’.
Hanging Poms Poms 1

Step Two: Using thick string or wire, in my case floral wire from Michael’s, tie it around the middle of your fan and leave a bit extra hanging off the end.
Hanging Pom Poms 2

Step Three: (Sorry the pics are reversed.. I just realized that…) After your string is tied, use scissors to cut a shape into the ends. I did a triangle. You could do a heart or a rounded-edge – whatever!

Hanging Pom Poms 3

Continue reading

Craft Project: Cut-out Ombre Canvas Art

Another mid-week art project!

You know that in order for me to do an art project, it has to be simple and I have to be able to do it in 15-20 minute chunks. This one totally fits the bill. If you want to try this (and you totally should!) you can do each step and stop and come back to it. I did Steps 1 and 2 in the morning. Then came back after work and did Step 3 and so on. Doing DIYs doesn’t have to take up all your time 🙂 It’s just a little reprieve from watching tv or doing dishes or vacuuming or whatever.

Okay – onto my inspiration!

Once again, walking through Target, I spotted these ombre metal cut-out wall hangings. (I think it was the same trip to Target where I spied the Nate Berkus tray I ended up knocking-off!) I quite liked them, but at $20 each I wasn’t totally sold. Then a couple days later, I snagged some blank canvases at the thrift store for $3 each. It dawned on me that I could recreate the cut-out ombre look for a heck of a lot less!Cut out Art

Here’s what you need:

  • A canvas
  • Craft paper large enough to fit over/on your canvas (Mine is 18×22 roughly and I used a roll of easel paper from Michael’s that is $5.99 for a whack of paper.)
  • Pencil, a ruler and scissors
  • Exacto knife and cutting board
  • Cast-off cardboard (I used a box from our recycling bin)
  • Acrylic paint in white and a colour of your choice and a couple of brushes
  • Staples, thumb tacks or glue

Continue reading

Craft Project: DIY Reclaimed Wood Photo Clip Boards

Happy Valentine’s Day everyone 🙂 I realize it’s actually tomorrow, but I plan to do nothing but get up, eat, go to work and watch Season 2 of House of Cards tomorrow – so this ‘Valentine’s Day’ post is a few hours early 😉

Dan and I have never really done Valentine’s Day. Frankly, I think it’s silly – but this year it gave me an excuse for a project I’d been wanting to do for a while.

As part of my 30-day challenge, I decided to use an empty photo album we had lying around. We had a gift card from the photo shop for prints, so I ordered a bunch of our photos online. When I picked them up, I realized that it would be nice to not only put them in the album, but also have some on display.

But frames are expensive. And I also tend to have a desire to constantly change things. So – I came up with a way to use some extra wood boards and create a changeable photo clip board!Photo Clip Boards

The process is super simple. I actually did this project over the course of about four days. Each step takes about 15 minutes, so you can easily spread this one out. I think one of these would be great in a foyer, a kids mudroom, a playroom for artwork, you name it! And trust me, even the most inexperienced DIY’er can do this one 🙂 Continue reading

(Crazy) Craft: DIY Faux Taxidermy

I know. I know. Just the title makes you say ‘what?!?’

Rest assured, no real animals were harmed in the doing of this DIY. Though, Buzz and Woody and that cute little Slinky from Toy Story are probably never going to forgive me.

Let’s start, as we always do, at the beginning. There is a land, a trendy land, full of faux taxidermy like this and this and this and this. I enjoy a trend, but I never want to spend a bucket load to indulge in it. So, I finagled a way to create my own faux, gold, taxidermy animals for our spare room/nursery for less than $10.

Faux Taxidermy 13If we are actually going to start at the beginning, it was with that black and white frame. As part of my 30-day challenge to get rid of/use something unused every day for a month, I had a brand new wooden frame that I painted up. Continue reading

How I made our faux-quilted head board

Howdy y’all!

It’s been an exciting week around here and it’s only Tuesday. I was so pleased when Kayla from the DIYers informed me that our little polka dot bed side table was being featured on their blog this week! Super fun! You should check out their site if you haven’t already, lots of good inspiration.

We’ve also set a tentative date to paint the second spare room and to start construction (or deconstruction!) of the nook.

Meantime, on the weekend, I showed you our guest room mini reveal. I thought I’d put up a little post on how I made the graphic print head board.

Head board 5

Continue reading